What absolutely PERFECT weather! We gathered at the park and made our solar cookers out of pizza boxes, we had numerous different types of food that families tried to cook--hotdogs, mini pizza, burittos, and even marshmallows. The food at least got WARM this year (much better than previous attempts) but I have to agree with Grant that I much prefer ELECTRICITY, GAS or PROPANE as a heat source for my cooking needs! Maybe if I live in a region that was consistantly HOT and I had a permanent cooker not made out of a pizza box, I would feel differently, but I don't!


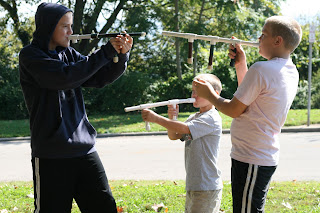
The kids had a great time assembling and playing with their marshmallow launchers. What great fun for the cost of some pvs, fittings and a bag of marshmallows. I even discovered that Walmart's brand of marshmallows are DYE FREE! WOOHOO!


Here is the email I sent to the group prior to the event:


The kids had a great time assembling and playing with their marshmallow launchers. What great fun for the cost of some pvs, fittings and a bag of marshmallows. I even discovered that Walmart's brand of marshmallows are DYE FREE! WOOHOO!


Here is the email I sent to the group prior to the event:
The weather is supposed to be GORGEOUS on Wednesday (October 5th) so I would LOVE to do something outdoors......here is the plan.....
SOLAR COOKERS and MARSHMALLOW LAUNCHERS!
When: Wednesday October 5 10 AM until people chose to leave
Where: Alms Park
http://www..cincinnati-oh.gov/cityparks/pages/-4647-/ let's plan to meet at the playground just past the pavilion, there are about 3 or 4 picnic tables right next to the playground that we can use to build the items at.Who: Homeschoolers of all ages. Children 12 and under will be expected to have a parent/responsible adult on premises with them during activities, Teens 13 and up may be dropped off.
What to bring: items listed below in RED and lunch for your family if you plan to stay and play (we plan to!). Please don’t count on the solar cooker food as LUNCH!
RSVP: Laura
The temperature is supposed to make it to 76 so I thought we could try solar cookers (see needed items below), let’s just plan on making one per family and seeing if we can get something to cook! While the food it attempting to cook, the kids can make and play with the MARSHMALLOW LAUNCHERS! I will bring the marshmallows, boxes (for solar cookers), black construction paper, straws, glue and scissors.
Items needed for marshmallow launcher (let me know if you need a picture of what the pieces look like!):
5 pieces of 1/2 inch diameter PVC pipe cut into 4” pieces (anywhere from 4-5” will be fine, it isn’t an exact science!)
2 “T” shaped pieces
1 connector piece (serves as the mouth piece)
2 caps
You can bring more pieces and more connectors of any type (t’s, crosses, 90 degree connectors) so your child can get creative, but all you really need are the items listed above to make a successful launcher (you can actually even get by with only 3 pieces of pipe, 1 t, a connector and 1 cap if you really need to get by cheaply!). Usually you can find someone at the hardware store that will cut the pipe for you if you don’t want to do it yourself!
I will get the boxes for the solar ovens (PLEASE RSVP so I know how many I need to find!!!)
For the solar ovens, each family needs to bring for themselves:
1)Aluminum foil
2)Clear plastic (heavy plastic laminate works best but kitchen plastic wrap is fine too)
3) tape
4)Whatever food you’ll be cooking (example - S’mores, hot dogs, English muffin pizzas, burittos, etc.)
5) If you want to add an optional feature (listed below) bring those items as well
How to Make Your Pizza Box Oven
The simplest pizza box solar oven design, as given below, can get up to two hundred degrees Fahrenheit on a warm sunny day. Several optional features will enable the oven to get even hotter, which may be desirable in cooler weather.
1)Assemble the pizza box, and open it up.
2)Glue aluminum foil to all inside surfaces of the sides except the top of the box, with the shiny surface facing in. This will create a "radiation trap" that will trap, by reflection, invisible
(low-frequency) radiation that is radiated by the food and air inside the box.
3)On the top flap of the pizza box draw a square with a marker with edges spaced 1" from the four sides of the box. Cut along three of the lines, on the sides and on the front edge of
the box, leaving the fourth line along the box's hinge uncut. Then fold open the flap, making a crease on the fourth line.
4) Glue aluminum foil to the inside surface of the top flap, with shiny side visible! This will form reflector, to reflect sunlight into the oven. Be careful to make as few wrinkles as possible, and smooth out whatever wrinkles occur.
5) Tape the black construction paper to the bottom of the box. This will help to absorb the incoming sunlight.
6) Carefully stretch the plastic wrap over the opening of the box, sealing the edges with tape to seal the air in.
7) Cover any air leaks around the box edges with tape, except while making sure that the box can still be opened, so you can place food inside the box and remove it later.
8) Go outside in the sunlight and place oven on a flat, level surface.
9) Place food on some foil and place inside the oven.
10) Prop open the flap of the box with a straw you have cut to fit until the aluminum reflects the maximum sunlight through the window into the oven interior.
11) Let food cook, and check reflector angle now and then to make sure sunlight is getting inside the oven.
12) Eat your food!
Can you improve your oven? Optional Features
Add addition flaps to reflect sunlight into the oven. This can
substantially increase the gain of the oven. This will require some
extra cardboard (from some old boxes for example), and some extra
foil, glue, and string to adjust the flaps.
Crumple up some sheets of newspaper and stuff them around the inside
of the box, to provide extra insulation.
Add an additional layer of saran wrap across the box opening, but
attached to the inside surface of the top flap, such that an air space
is created between the layers of wrap (the plastic is bound to stick
together in some places: don't worry about this too much).
Place a thermometer inside the oven as well, to measure the temperature.
The principles demonstrated are:
Solar Gain - arranging for sunlight to enter a device as a source of
energy. In this case, the gain is accomplished both by reflection and
direct gain. This principle also includes using dark colored surfaces
to absorb the solar energy that enters a device.
Insulation - containing heat by trapping air inside and around a
device to contain heat, and reflecting thermal radiation back into a
device.
The third principle of passive solar design - thermal mass, can also
be experimented with the solar oven. If you are interested in this
option, see the project "Build a Passive Solar Design Laboratory"
for ideas. Large amounts of food will provide some thermal mass,
causing the oven to heat up more slowly.
Some interesting Solar Oven information:
Cooking food takes a lot of energy! By using solar energy, we can save on fuel.
Solar ovens have been used for a long time. In the 1830s, the British
astronomer John Herschel used a solar collector box to cook food
during an expedition to Africa. Nowadays, one can buy commercial solar
ovens, ranging from small single dish units, to large units that can
feed many people at once and that have to be hauled around on a
trailer.
Without the reflector flap, the solar oven becomes what is called a
"flat plate collector". Flat plate collectors are used for many
applications, such a heating water (the reason for not using a
reflector is that it is not really needed for these applications- and
thus alignment difficulties associated with reflectors can be
avoided). One of the first known uses of solar hot boxes was by the
cooks of the Roman Emperor Tiberius who wanted to eat cucumbers all
year round. The cooks satisfied his regal appetite by using a solar
hot box, a kind of flat plate collector, to grow the cucumbers all
winter long! Nowadays, many people also use flat plate collectors to
heat water for their pools and houses
No comments:
Post a Comment